March 31, 2009

Easter dinner at my house - what dessert should I serve?


After reading the April issue of Gourmet, I felt suddenly inspired to host an Easter potluck dinner. Along with the traditional ham, I'm brainstorming desserts to make. I'd love to hear suggestions from my readers - leave them in the comments section!

Food Bytes: What’s Cooking Online? - Free food blogging seminar in NYC!


My pal Chris alerted me to this fantastic free food blogging seminar hosted by the New York Institute of Technology that is taking place this week (details below). Renowned food bloggers and industry folks Lisa Fain, (Blogger at Homesick Texan), Michael Laiskonis (Executive Pastry Chef at Le Bernardin & Food blogger), and Ed Levine (Founder of seriouseats.com and author of New York Eats) will be in attendance. This is a MUST for anyone (such as myself) who one day hopes to have a career in the food industry, in one form or another.

WHAT: Food Bytes: What’s Cooking Online?

WHEN: Apr 2, 2009, 6:30PM to 8:00PM

WHERE: New York Institute of Technology, 16 West 61st Street, 11th Floor (between Broadway and Columbus), New York, NY

COST: FREE!

DETAILS: Every day millions of avid food aficionados surf the Web in hopes of finding Food Nirvana. Learn from our panel of food bloggers how they are achieving cult status online, and find out why virtual cuisine is the big enchilada.

SPECIAL GUESTS: Lisa Fain, blogger (Homesick Texan), Michael Laiskonis (Executive Pastry Chef at Le Bernardin & Food blogger), and Ed Levine (Founder of seriouseats.com and author of New York Eats)

RSVP: Visit www.cencom.org, email info@cencom.org or call 212-686-5005

Great dessert quote...


"Unless your name ends in Baskin or Robbins, I really can't fit you into my schedule right now." ~ Uniek Swain

March 30, 2009

Great dessert quote...


"There are two kinds of people in the world: those who love chocolate, and communists." ~ Leslie Moak Murray

CupcakeCamp NYC Baker's Registration This Wednesday, April 1st!


For all you New Yorkers interested in bringing cupcakes to CupcakeCamp NYC on April 10th, the deadline to register your treats is this Wednesday, April 1st! E-mail cupcakecampnyc@gmail.com for a registration form or with any questions.

If you want the chips in chocolate chip cookies to retain their shape better, freeze them before adding to batter.

Courtesy of Foodimentary.

March 27, 2009

Spring Flours (get it? Flour? Flower?)


Sorry for the lame joke, but I feel like every time I turn around today I'm reading something about flour. The Examiner has a great article that explains all the different types of flour. The article is extremely educational and will help anyone who has ever found themselves staring at a shelf of flour in the grocery store and not sure what kind to buy. Also, the author provides some tips on how to store flour, which is something we should all pay attention to as to not be wasteful with our ingredients.

The Examiner: Choosing the Right Flour for Your Baking
March 27, 2009

With all the different types of flour on the shelf, it can be confusing to try and buy the right one for all your needs. Each type of flour works best for certain baked goods, and using the wrong flour can lead to unappetizing desserts. Flour is graded and sold based on the protein content and purpose. Perfect pastries are just around the corner if you keep these quick facts in mind.

Protein Content of Various Flour Types
Bread Flour - Bread flour has the highest protein content of the different types of flour, ranging from 11% to 13%. This helps it create strong gluten networks in breads.

All Purpose Flour - All purpose (or AP) flour typically has a protein content of 10 to 11 percent. It is created from a combination of hard and soft wheat and is the most common flour in home pantries.

Pastry Flour - Pastry flour has a slightly lower protein content than AP flour, falling between 8 and 10 percent. Pastry flour helps make tender pie crusts and cookies.

Cake Flour - Cake flour has the lowest protein content (between 6% and 8%) and is perfect for creating the delicate texture of most cakes. It is also typically chlorinated to soften the flour further.

Special Types of Flour
Whole Wheat Flour - Whole wheat flour uses the entire grain, causing it to have higher fiber content than the other types of flour. The wheat germ provides higher oil content, so it has a shorter shelf life and should be stored in the freezer if you are keeping it long-term.

Self Rising Flour - Self rising flour typically has a protein content of between 8 and 9 percent, but also contains salt and baking powder.

Semolina Flour - This hard wheat flour is typically used in making pastas and other Italian offerings.

Storing Your Flour
Proper storage is key if the flour is going to stay in your pantry for some time. Package the flour in a moisture-tight container and store it in a cool, dark location. All flour can be kept safely in the freezer, as long as it is in a secure container. Most flour has a shelf-life of approximately 6 months.

Every ingredient is important if you want to make the best tasting breads, pies, and cookies. Choosing the right flour for your project will improve your odds of success.

Recipe of the Day - Raspberry Almond Breakfast Tart


Over the past two days, I've posted two out of the three winners of Pepperidge Farm's Puff Pastry to Paris contest - Chocolate Almond Raspberry Cannoli Shells and Candy Bar Puffs. Today, I'd like to present the final winner - Lisa Key's Raspberry Almond Breakfast Tart.


Raspberry Almond Breakfast Tart Recipe

Lisa Key's Description:
Easy and elegant this is a family favorite breakfast pastry reminescent of a local fancy French bakery. It can be served for brunch or even a dessert.

Equipment:
8-inch square baking pan
Measuring cups
Measuring spoons
Measuring spoons
Whisk
Cooling rack

Ingredients:
1 (12.5 oz.) package Pepperidge Farm Raspberry Turnovers
1/2 cup sugar
1/2 cup heavy cream
1 egg
1 teaspoon almond extract
1/2 cup sliced almonds
Powdered sugar, optional
Fresh raspberries and mint, optional


Heat oven 475F. Remove all wrapping. Arrange turnovers, in a single layer, in an ungreased 8-inch square baking dish with the pointed end of the turnovers toward the center of the pan. Place turnovers in oven.Immediately reduce temperature to 400 F. Bake 20 to 25 minutes or until outer edges of turnovers are golden brown.

Meanwhile, In small bowl, whisk sugar, heavy cream, egg and almond extract until well blended. Pour mixture over baked turnovers. Sprinkle evenly with almonds. Bake 20 to 25 minutes longer or until tart is a deep golden brown.

Cool 10 to 15 minutes. Serve warm cut into wedges. Dust with powdered sugar and garnish with fresh raspberries and mint, if desired.

Serves 4.

Fun fact about flour (and a little good luck to the Kansas Jayhawks!)


Puff and Choux wants to wish the Kansas Jayhawks good luck in tonight's NCAA basketball game vs.Michigan State. As a Jayhawk alum, you can never spread enough ROCK! CHALK! JAYHAWK! in the world.

So, to cheer on this blog's favorite team, we wanted to dedicate this fun fact to them today:

Kansas is the largest producer of flour in America. Enough annually to make over 15 billion bread loaves.

Courtesy of Foodimentary.

CupcakeCamp NYC- there is still time to join in!


The outpouring for CupcakeCamp NYC has been amazing - who ever thought that there were so many cupcake lovin' New Yorkers? For those of you who are still hoping to get a piece of the action, just e-mail the CupcakeCamp NYC team at cupcakecampnyc@gmail.com to register as a baker, a volunteer, or to simply RSVP for you and your friends!

March 26, 2009

Recipe of the Day - Chocolate Almond Raspberry Cannoli Shells


Yesterday, I posted the first of three grand prize recipes from Pepperidge Farms' contest, Puff Pastry to Paris. Today's recipe is from the next grand prize winner, Aylin Tito, who offers us Chocolate Almond Raspeberry Cannoli Shells.


Chocolate Almond Raspberry Cannoli Shells Recipe

Alyin's Description:
This recipe combines some of our favorite dessert ingredients: Cannolis, raspberries & chocolate. I started off with just a basic cannoli in the puff pastry shell & then thought of ways to top it! After many combinations, this was our favorite! The flavors just work so well together & do not over power each other! Looks decadent & impressive, but does not feel heavy or overly sweet! Great balance with the flaky pastry!

Equipment:
Microwave
Mixing Spoons
Mixing Bowls
Cooling Rack

Ingredients:
1 package of (6) Pepperidge Farm Pastry Shells
1 cup whole milk ricotta cheese
1/3 cup powdered sugar
1 tsp. almond extract
1 candy bar (41grams) Dark Chocolate
1 10 ounce package of frozen raspberries in syrup, thawed
1 cup slivered almonds


Preheat oven to 400 Degrees. Place frozen shells on a cookie sheet lined with parchment paper ("Top" side up) & brush with an egg wash (1 egg & 1 Tsp water, beaten).

Bake for about 18-20 minutes until browned & puffed up.

In the meantime, shave off thin, small pieces of the chocolate bar using a vegetable peeler. You will need a total of 2 Tablespoons of the chocolate shavings. Set aside.

Then break up the rest of the chocolate bar in to smaller (approx. 1") pieces and place into a microwave safe bowl or cup.
Heat for 30 seconds and stir. Repeat until smooth completely melted.

Once the puff pastry shells are done, let rest 1 minute on a wire rack. Then using a teaspoon, carefully remove the "top" part of the shells & center pastry layers. Once the pastry shells have cooled, dip the tops of the shells (about 1" of the tops) into the melted chocolate & place back on the wire rack until the chocolate has hardened (about 15 minutes).

In the mean time, prepare the cannoli filling. Mix ricotta cheese with the powdered sugar and almond extract. Stir until well combined. Fold chocolate shavings into the cannoli cream until incorporated.

Fill the pastry cups with 2-3 Tablespoons of the cannoli filling, top with 1 tsp. of slivered almonds and 1 Tbs. of raspberries.
Garnish with additional almond slivers if desired.

Serves 6.

For the more tech savvy foodies out there...


I've mentioned Twitter on this blog before (see the post here), so for those of you other Twitterers or foodies who have just joined Twitter, I wanted to share the names of some of the best foodie Twitterers out there. I love hearing about all their cooking tips and advice, funny quotes and just their general conversation. Some of these are baking/dessert focused, but some are just general food experts.

If you're on Twitter, you should definitely be following:

@Foodimentary
@LIfeByChocolate
@FoodBizDaily
@eaterny
@TheGourmetGirl
@GlittleCupcakes
@FoodimentaryGuy
@imafoodblog
@fonduejunkie
@Eat_Real
@TheBestCupcake
@JavaCupcake
@WhatsGabyCookin
@kalynskitchen
@spoonmovement
@cupcakeblog
@CupcakeCamp
@CandyUSA
@FoodStories

This is by no means a complete list - there are loads more I follow who are super smart in the food space. You can see all the people I follow by visiting my Twitter page.

Dairy free desserts are coming your way courtesy of New York City


For those of you out there that are in the market for dairy free desserts, New York City is boasting a new shop for you. Stogo's in the East Village boasts a menu of soy-based treats, such as dairy free ice cream and sorbets, without any artificial flavorings. Additionally, they stock vegan cupcakes from Babycakes, so for those days when it's not quite warm enough yet to indulge in a frozen treat, you'll have options.

You can read all about the shop on Tasting Table by visiting here.


When in New York City, be sure to visit:
Stogo
159 E. 10th St. (between Second and Third Aves.)
P: (212) 677-2301
www.stogonyc.com

If you're in New York, you can't miss this cookbook sale!


Tasting Table has alerted me to a great event that is taking place this weekend in New York City. The James Beard Foundation is hosting their biannual cookbook sale. Admission is free, and all books cost $5 and up.

So for all of you looking to try out some new dessert recipes, swing by this event - it's for a great organization and we could all use fresh additions to our recipe favorites!


Event Details:

What: Books for Beard - The James Beard Foundation's Biannual Cookbook Sale

When: Saturday, March 28th, 2009 @ 10 a.m. to 1 p.m.

Where: James Beard House, 167 W. 12th St. (between Sixth and Seventh Aves.)

March 25, 2009

Dessert Quote of the Day


“Life is short; eat dessert first." ~ Ernestine Ulmer

If one more person talks about bacon...


I've never considered myself a trendy person. I might be a hipster in some sense of the word, but not particularly trendy. So when it comes to this sudden craze around bacon, I've had enough.

I'll admit - I love bacon just as much as the next guy or gal. But if I have to read one more story about bacon fried this, bacon fried that, bacon explosions, etc., I'm going to become a vegetarian.

I mention this because now, bacon fans have taken things too far. In todays Tasting Table, there is an article titled "When Trends Collide: It was inevitable. Cupcake, meet bacon." This is the straw that broke this camel's back. ENOUGH ALREADY! Food fusions are as annoying as celebrity name hybrids (TomKat, Brangelina, etc.), but when you go and take something as innocent and delicious as the cupcake and pervert it with bacon bit sprinkles, I call your bluff gentlemen and ladies. Perhaps it's because I come from a family where my mother won't let her food touch on her plate (it will be cold day in hell before my mom's mashed potatoes ever mingle with her asparagus), but some things should simply be left on the drawing room floor - I feel like this bacon cupcake trend is one of them. I mean seriously - how appetizing does a BLT cupcake topped with ranch-flavored frosting, heirloom tomatoes and microgreens, or a potato cupcake topped with sour-cream frosting, chives and bacon crumbles really sound?

However, Tasting Table seems to think the bacon/cupcake mating is tasty enough to warrant an entire article so I'll give them the benefit of the doubt and let this one slide. Find out about this annoying trend for yourself and read about it here.

CupcakeCamp NYC has a media sponsor


Rumor has it (as in I know this isn't a rumor I have just always wanted to say that) is that CupcakeCamp NYC (my pet project) has scored a media sponsor. Well, I have! The lovely team over at Cupcakes Take the Cake have signed on to be the exclusive media sponsor of CupcakeCamp NYC, and I couldn't be happier.

Be sure to check out Cupcakes Take the Cake and the official site for CupcakeCamp NYC!

Recipe of the Day - Candy Bar Puffs


Over on PuffPastry.com, a site run by Pepperidge Farms, the winners of the Puff Pastry to Paris contest were just announced. The three Grand Prize winners will recieve a 7-day trip to Paris and $5,000 spending money. Pretty awesome, huh? Had I known about this contest earlier, I would have posted a note about it so all you readers could have submitted recipe ideas for a chance to win. Well, you'll just have to settle on making the winners' recipes instead.

Over the next three days, I'll be showcasing each winner's recipe. And now, I present the first of three Pepperidge Farm's Puff Pastry to Paris contest winners - Dan Rensberger. His recipe for Candy Bar Puffs is today's Recipe of the Day!


Candy Bar Puffs Recipe

Dan's Description:
I have served these at many family gathering as well at church functions and Red Cross functions for which I have made desserts. I always get raves about these puffs and everyone never knows how easy they are to make. I use so much puff pastry for these and many other recipes that I buy the puff pastry by the case at a restaurant supply company. I have made many of the recipes listed on your website and even gave an informal class on the use of puff pastry (from appetizers to main dishes to desserts) for a group from my church.

Equipment:
Mini muffin tins
Cooling Rack

Ingredients:
3 Sheets Puff Pastry Sheets
36 to 48 Miniature candy bars such as Milky Way, Snickers or 3 Musketeers
2 ounces Melting Chocolate (Milk, Dark or White)

Preheat oven to 375 degrees F. Thaw pastry sheets.

Cut pastry sheets into 2 inch squares. Place miniature candy bar top down on pastry square. Fold corners up to center. Seal all seams thoroughly (candy will leak out if not completely sealed).

Place wrapped candy seam side down in mini muffin tins that have been lightly sprayed with a quick release spray. Bake puffs for 10 to 12 minutes, until puffy and slightly browned.

Remove from oven, allow to cool slightly then remove from pan to finish cooling. When puffs are cool, melt chocolate and drizzle over the tops.

These puffs are slightly fragile, but can be frozen for 1 to 2 months.

Serves 6.

CupcakeCamp NYC - we need bakers!


If you are a New Yorker and love cupcakes, we need your help! We are in need of people to bring cupcakes (either homemade or store-bought) to CupcakeCamp NYC on Friday, April 10th. The event is being held at Happy Ending Lounge and starts at 7:30 p.m.

E-mail cupcakecampnyc@gmail.com if you are interested in bringing cupcakes!

March 24, 2009

Food quote from my idol, Julia Child


"The only real stumbling block is fear of failure. In cooking you've got to have a what-the-hell attitude."~ Julia Child

Courtesy of Foodimentary.

Tomorrow is Pecan Day


Do you ever have those moments when you are minding your own business on the Internet and something shocking finds it way to your laptop? It's happened to all of us, and this time, this was the result: There is actually a professional organization called the National Pecan Shellers Association. I found their web page while doing research on Pecan Day, which happens to be tomorrow, March 25th.

Among other things, I learned that the pecan tree is the only major tree nut that grows naturally in North America. Also, George Washington was a massive fan of pecans. Neat, huh? Dork, yes.

For those of you looking to celebrate Pecan Day with a special dessert, I suggest checking out the group's web page. They have some great recipes, including Pecan Banana Bread and Banana Pecan Strudel.

Recipe of the Day - Mint Chocolate Cheesecake


I recently started using a new shampoo that has a distinct minty smell. And let me tell you, when that shampoo bottle bares the slogan "Guaranteed to wake you up!", they aren't kidding. That tingly mint really gets you going in the morning. Plus, you smell like a peppermint candy at first thing in the morning, and by my calculations, that's never a bad thing. If they could figure out a way to bottle the scent of orange Tic-Tacs in perfume form, I'd be all set.

It's my new minty shampoo that has inspired today's Recipe of the Day choice. So, as you take your first bite of this mint chocolate cheesecake, thing of my superb scalp and my wonderful morning shower ritual. Appetizing, no?


"If you licked my head, it would taste just this cheesecake" Mint Chocolate Cheesecake Recipe

Equipment:
9-inch springform pan
Electric mixer
Mixing bowls
Measuring cups
Measuring spoons
Cooling rack

Ingredients:
1 1/2 cups finely crushed Oreo cookies (about 18)
3 Tablespoons butter, melted
3 (8 oz.) packages cream cheese, softened
1 (14 oz.) can condensed milk (not evaporated)
3 eggs
3/4 teaspoon peppermint extract
1/4 tsp. green food coloring (optional )
1 cup mini semi-sweet chocolate chips
1 teaspoon flour


Preheat oven to 300 degrees F. Combine cookie crumbs and butter. Press firmly on bottom of 9-inch springform pan.

In large mixer bowl beat cream cheese until fluffy. Gradually beat in sweetened condensed milk until smooth. Add eggs, peppermint, and food coloring; mix well.

In small bowl, toss 1/2 chips with flour to coat; stir into cheese mixture. Pour into prepared pan. Sprinkle remaining 1/2 cup chips evenly over top. Bake 1 hour or until cake springs back when lightly touched.

Cool to room temperature. Chill about 4 hours.

Recipe courtesy of MomsWhoThink.com.

Follow Puff and Choux i.e. the author of this blog on Twitter!


Some of you may have noticed the sidebar of this blog, and amongst other things, I have my Twitter feed posted. If you are a Twitterer, let's be friends! I follow quite a few foodies- not just dessert folks, but wine enthusiasts and culinary geniuses in general one of my favorites is @Foodimentary, a site you'll see credited quite a bit around these parts.

If you'd like to follow me, click here.

Baking tip from Foodimentary


An angel food cake will slice neatly without crumbling if you freeze it first, then thaw it.

Courtesy of Foodimentary.

March 23, 2009

"Picasso of Pastry" heads to London


There is a great piece in the London Times this week about famed French pastry chef Pierre Hermé. Rumor has it that Hermé will soon be opening up one of his world-famous pastry shops in London sometime this year. He currently owns four boutiques in Paris and eight in Tokyo.

Hermé is known for his macaron artistry, so it's safe to say that I now consider him my culinary idol. His latest macaron creation includes wasabi – spicy Japanese mustard – and grapefruit. Don't knock it 'til you try it!

Great Dessert Quote


"Hide it in a hiding place where no one ever goes,Put it in your pantry with your cupcakes" ~Simon and Garfunkel

Courtesy of Foodimentary.

New York Times: One Cupcake, One Mouthful


At NYTimes.com today, there is a great article by Florence Fabricant about a new take on cupcakes from baker Melissa Bushell, owner of Baked by Melissa.

The article calls Bushell's creations the ultimate recession-proof treat - a single bite-size portion of cupcake. This tiny treat will cost you $1, which seems a bit steep when you can get a normal-sized cupcake, and mighty delicious one at that, from sugar Sweet sunshine for only 50 cents more.

What are your thoughts on Baked by Melissa's business? Do you think it's a rip off or do these bit sized treats have a place in the world of New York City cupcakery?

Baking tip from Foodimentary


Tastier Cakes: When cake mix calls for water use buttermilk instead. It will make the lightest and best cakes.

Courtesy of Foodimentary.

Guest Blogger Post: ChikaLicious - the ultimate dessert experience


I'm happy to feature Puff and Choux's first guest blogger today, and I'm even happier that this person is Bradley Matthews. Bradley is a dear friend of mine and has always been a champion of my crazy ideas - this blog being one of them. I'm telling you folks, you can't ask for a better friend than Bradley - he's got the "greatest friend in the world" title nailed down pretty tight.


ChikaLicious - the ultimate dessert experience
By Bradley Matthews

Firstly, I'm honored to be a guest contributor on Puff and Choux. I (and the other indulgent heffers out there) love this site.

On Saturday I FINALLY treated myself and another dessert whore to the ChikaLicious experience over on 10th Street at 2nd Avenue. I've walked by this place for ages and have always wanted to try it. Something about the white decor...the oblong bar...the minimal seating...and the simple phrase 'dessert bar' were all quite enticing. We realized that the main experience opens at 3pm on Saturday and mistakenly ended up in the 'casual cafe part of ChikaLicious' across the street which offers desserts to go without the experience of getting to watch the chefs MAKE the dessert. I equate it like going to a Benihana 'to-go cart' without getting to see the Japanese chef fling the shrimp tails all over the table and bang the salt/pepper shakers to a beat.

I should preface the rest of the story with the fact that the person whom was with me is a dessert connoisseur. He had been to ChikaLicious previously, so his expectations were high. Upon entry, we were immediately seated at a side-table, so we didn't actually get to watch the chefs prepare the desserts. A Bob Marley mix played throughout our whole ChikaLicious experience, so I was happy as a clam (pretty easy to please on the musical front I suppose).

Let's get on to the desserts. We ordered a Prixe Fixe course with a matching wine (ChikaLicous picks the wine for you based on your dessert choices). We started with the 'Amuse'...a panna cotta of some sort...I honestly can't remember as the portion fit on one scoop of my spoon. I know this is a tasting, but come on people! At least provide us with smaller, more delicate spoons. The heavy monstrosity we were required to use diminished the decadence of the experience. The second dessert is the 'main course' and is the dessert of your choice. I had the white chocolate mousse which I found to be quite smooth and tasty, until I then tasted my accomplice's dessert. He had the chocolate tart with peppercorn ice cream. I think that was the best dessert and ice cream I've had in a while. The chocolate tart was filled with chocolate ooze that ran like a river into the ice cream. The ice cream literally tasted like pepper...I've never experienced that. Something about curling up on a couch watching horrible movies eating peppercorn ice cream sounds a little too bourgeois-esque (bourgy if you will) for me, but DAMN was that scrumptious. I kept having to sneak tastes from him. We wrapped up the tasting with the 'Petit Fours,' which included four bite size samples of cookies and chocolates.

Since we ordered different 'main course' desserts, we each were provided with different wines. I received a sparkling sweet blush of some sort...I tasted flower essence of some sort...it basically was a perfect match for my light mousse. He received a dark port to match his chocolate tart. I've never been a huge port fan, and drinking port at 3:30pm just seems wrong for some reason. It seem to overpower the amazing tastes of the chocolate tart and the peppercorn ice cream.

We both LOVED the two owners: Chika (the chef...the cutest Japanese woman I have ever seen) who would come to our table to introduce the dessert courses in a thorough and professional manner, along with her partner in crime (and husband), Don, whose kind personality was a perfect match to Chika's, making me think that if they had a child (which they may), it MAY just be the cutest, most meek baby ever.

All in all, ChikaLicious was an amazing experience. I could have probably scarfed down ten helpings of each dessert easily, but I suppose they don't want to fatten us New Yorkers up TOO much. Most of us don't have Segways (although I would love one...but I hear they are illegal in New York...I digress).

When in New York, be sure to visit:
ChikaLicious Dessert Bar
203 E. 10th Street
New York, NY
P: (212) 475-0929
www.chikalicious.com

March 20, 2009

CupcakeCamp NYC announces venue and date!


CupcakeCamp NYC, my little side project, is all systems go! After week of being turned down by bar and venue owners when I approached them to host the event, the folks at Happy Ending Lounge have come through with shining colors!

Here are the details:

WHAT: CupcakeCamp NYC - please visit our website!

WHEN: Friday, April 10th, 2009 @ 7:30 p.m. to 9:30 p.m.

WHERE: Happy Ending Lounge - 302 Broome Street, New York, NY (b/t Forsyth and Grand)

If you are interested in baking and/or volunteering to work the event, please e-mail me at cupcakecampnyc@gmail.com.

If you are interested in just attending and noshing on cupcakes, e-mail me at cupcakecampnyc@gmail.com.

I can't wait to see all of you on the 10th!

And for those of you with some questions, read this:

1. Can I buy or sell cupcakes at the event?
No. CupcakeCamp is for people who want to bring cupcakes and eat them for free *at the event*.

2. Can I really attend if I don’t bring cupcakes?
Yes! While bringing cupcakes is encouraged, we need 11 people to eat a cupcake for every dozen!

3. I’ve heard the event is based off of BarCamp, what is that?
Check out http://barcamp.org

4. Do we bake or decorate our cupcakes at the event?
No - your cupcakes should be ready to go at the event. However, feel free to organize your own baking get-togethers with friends before CupcakeCamp!

5. Where have CupcakeCamps already taken place?
People have organized CupcakeCamps in San Francisco, Pittsburgh and Toronto so far! Check out CupcakeCamp.org for the history of this amazing movement!

Recipe of the Day - Wrapped Pears with Vanilla Bean Sauce


I'm not going to lie - the only reason this dessert caught my eye is that earlier this afternoon, i was at Crate and Barrel and saw a giant pear that was supposed to serve as a table decoration. I thought it looked cool and for the rest of the day, I've had pear on the brains.

Lucky for us, the folks over at Pepperidge Farms, the geniuses behind the Goldfish Cracker, came up with this tasty little number - a pear wrapped in dough. It's good for you because it's fruit! (sort of...)

Happy Friday!


"It's Friday and I'm not feeling all that creative" Wrapped Pears with Vanilla Bean Sauce Recipe

Equipment:
Saucepan
Measuring cups
Measuring spoons
Mixing bowls
Wood spoon
Spatula
Baking sheet
Melon baller
Peeler

Ingredients:
3 cups water
3/4 cup sugar
1/2 vanilla bean, split
4 Bartlett or Bosc pears, cored and peeled*
1/2 cup heavy cream
1/2 of a 17.3-ounce package Pepperidge Farm® Puff Pastry Sheets (1 sheet)
cold water
Granulated sugar
fresh raspberry


Use a melon baller to core the pears from the bottom and remove the seeds. Peel the pears, leaving the stem intact. Cut a thin slice from the bottom of each pear so that it will stand upright.
Heat the water, sugar, and vanilla bean in a 2-quart saucepan over low heat, stirring occasionally, until the sugar is dissolved.

Add the pears and cook for 10 minutes or until the pears are tender, turning occasionally. Remove the pears from the sugar mixture. Cover and refrigerate for 1 hour or until the pears are cold.

Stir the cream into the sugar mixture. Cook and stir for 20 minutes or until the mixture boils and is reduced to about 3/4 cup. Remove the vanilla bean and scrape the seeds into the sauce.

Thaw the pastry sheet at room temperature for 40 minutes or until it's easy to handle. Heat the oven to 400°F. Line a baking sheet with parchment paper.

Unfold the pastry sheet on a lightly floured surface. Cut the pastry sheet crosswise into 8 (3/4-inch wide) strips. Brush the strips with the water and sprinkle with the sugar. For each pear, join 2 pastry strips by pressing the ends together. Wind 1 strip of pastry around each pear, tucking the end under the bottom of the pear. Place the wrapped pears onto the baking sheet. Loosely cover the wrapped pears with aluminum foil.

Bake for 25 minutes or until the pastries are golden. Spoon the vanilla sauce onto 4 plates. Top each with 1 pear and garnish with the raspberries.

Betty Crocker jumps into the tech age - new Betty Crocker iPhone app now available


For many of us, our first foray into baking involved two words: Betty Crocker. Invented in 1921, this imaginary persona has ruled many a kitchen since Marjorie Child Husted first introduced this icon to the American public. And now, Ms. Crocker has become even more modern - she's now available on the iPhone.

The Betty Crocker Mobile Cookbook iPhone app, currently ranked #13 as the most popular free iPhone app on iTunes, is essentially the digitized version of the 150-year old Betty Crocker Cookbook. A free download, the app gives users more than 4,000 recipes from the legendary cookbook.

Features include:
~ Recipe Search: Know what you want to make? See how Betty makes it.
~ Ingredient Search: Tell us what you have and what type of food you’re making, and we’ll deliver ideas to you.
~ "Surprise Me": Get a random recipe from the cookbook.
~ Recipe Detail with Photos: Step-by-step instructions and full nutritional information.
~ Recipe Email: Send the recipe to yourself or a friend.
~ Favorites: Quick access to your favorite recipes.


The Betty Crocker Mobile Cookbook is available for free in the iTunes App Store. You can download by visiting here.

The icing on the tea cake: New York City's Ritz-Carlton gives tea time a modern twist


Starting April 1, cupcake fans can join the bourgeoisie and visit New York City's Ritz-Carlton for Cupcake Tea in the Star Lounge.

Costing $25 a head, the Cupcake Tea menu consists of a pre-set selection of fie petite, freshly-baked gourmet cupcakes as well as a choice of Ritz-Carlton blend teas (or one non-alcoholic beverage).

If you're curious, the cupcake flavors available will be:
*Rich red velvet cake with traditional cream cheese frosting
*Orange "creamsicle" cake with creamy Tahitian vanilla filling and buttercream frosting
*Lemon chiffon cake with vanilla bean buttercream frosting
*Valrhona chocolate cake with whipped Valrhona chocolate ganache frosting
*Tahitian vanilla cake with vanilla bean buttercream frosting

When in New York, be sure to visit:
Cupcake Tea in the Star Lounge
The Ritz-Carlton Hotel
50 Central Park South, New York, NY 10019
P: (212) 308-9100
www.ritzcarlton.com

Saturday and Sundays April 1 to June 28, 2009 from 11 a.m. to 2:30 p.m.
$25 per person

Pastry Quote of the Week


"There are only four great arts: music, painting, sculpture, and ornamental pastry." ~ from My Life in France by Julia Child and Alex Prud'homme

Orangette teases the palates of readers with a chapter from her new book A Homemade Life


On Wednesday night, I was fortunate enough to attend the Molly Wizenberg a.k.a. Orangette book event at Idlewild Books here in New York City. You could call Molly one of the first food bloggers (in fact, she was on the cutting edge to just be blogging in general) - she started Orangette over four and half years ago, and I think most people would argue that blogging was still relatively unknown back in late 2004 early 2005. I was excited to meet her as she is someone who has successfully navigated almost every major medium a food writer can tackle - a blog, a monthly column in Bon Appétit and now a book - A Homemade Life.

Wizenberg has been a self-described "foodie" from birth. She can even recall her first article focused on the topic of food, a poem about wanting to immerse herself in a vat of marshmallow fluff

"I didn't realize that not all families were as obsessed with cooking as mine was," she said. "It's all I knew."

At first, she didn't know what she wanted to do with her interest in the culinary profession - she just knew she loved food. The rest was supposed to fall into place.

After a stint working in the kitchen of a San Francisco vegetarian restaurant, Wizenberg realized that working in the back of the house wasn't the path she wanted to take. The disconnect between preparing the food in the kitchen and actually seeing people enjoying it at the table was disappointing, so the dream of attending culinary school was scratched. She was back at square one.

Wizenberg admits that she had secretly been thinking about being a food writer, but she filed the idea away as nonsense. Not knowing where to start, she was scared to try.

"I was terrified to write because I loved it so much," she said. "The fear made it that much harder because of that love for both writing and food. If you fail, it's all the more worse."

But after the death of her father, Wizenberg reached her tipping point. It was during lunch with her friend that the idea of a blog came up. It was 2004, and although she didn't exactly know what a blog was (not many people did then), she thought her friend was right - the blog would give her something to be accountable for so she couldn't give up that easy if it proved to be difficult in the beginning. Not too long after, Orangette was born.

Orangette soon took on a life of its own. More and more people began to read Wizenberg's posts, relating to her stories about a love of food and family. It was this success and reader loyalty that led to a book deal with Simon & Schuster and the birth of A Homemade Life, Wizenberg's first book.

"Honestly, I was starting to hate the blog," she said. "The immersion process of the book taught me to love the blog again, showed me how much it could be."

And if the at capacity crowd was any indication at Wednesday night's event, Wizenberg isn't the only one who loves Orangette.

You can buy Molly Wizenberg's A Homemade Life on Amazon or your local bookstore.

March 19, 2009

I love irony.


I find it ironic that the Google ad that always appears on my blog is typically for weight loss. Seeing said advertisements always makes me laugh. I write a blog about pastries and desserts - do you really think I give a damn if I have jiggly thighs or not?

How to decorate Spring cupcakes, courtesy of the Culinary Institute of America

Recipe of the Day - Coconut Cake


When I was growing up in Oklahoma City, my mother always shopped at Kamp's Grocery, a small locally owned grocery store that had been in Oklahoma City for ages. I loved going to Kamp's for numerous reasons, the main ones being that the butcher/deli person would always sneak us slices of cheddar cheese to snack on and that for some reason, my mom was a lot more open to the idea of purchasing Kool-Aid at Kamp's than she was at other grocery stores.

Another reason I looked forward to our Kamp's trips was the promise of my mom buying one of their coconut cakes. This cake was the type of treat you would think about for days after tasting it. No one could resist its charm, and I'm sure many coconut nay sayers were swayed to the other side by its amazing buttercream icing, adorned with flecks of fresh coconut.

Kamp's eventually closed, and as many things have done, that coconut cake was filed away as a casualty of an even bigger problem - the inability of "mom and pop" shops to keep their doors open as chain grocery stores and Wal-Mart pushed them out of the way. But I never forgot that cake, and neither did my family, especially my mom. Over the years, the Kamp's coconut cake would occasionally come up in conversation, with each of my family members recalling their favorite aspect of this bakery masterpiece. The conversation always ended with ,"God, that cakes was delicious - no one makes it like Kamp's."

Oh, there were cheap imitators that tried to win our affection. A constant parade of second-rate icings, stale coconut topping and crumbly cake passed over our palates, each bite reminding us how good we once had it. The Kamp's coconut cake was now a legend, right up there next to the Knights of the Roundtable and that theory that states if you say "Bloody Mary" three times in front of a bathroom mirror with the lights off, Bloody Mary herself (whomever that is), will appear.

A few years ago, I was perusing the Dean & Deluca catalog online. I was looking for something seasonal to send my mom for her birthday, and a few months earlier I had found some adorable Springtime cookies that I had ordered for both my parents and which they seemed to enjoy. Page after page led me to delicious gift options, but nothing was really jumping out at me as something my mom would appreciate for her birthday. Summer-themed cookies in the shape of bumblebees, flowers, beach balls, as well as beautiful fruit tarts and more paraded in front of me, but alas, nothing said "Mom."

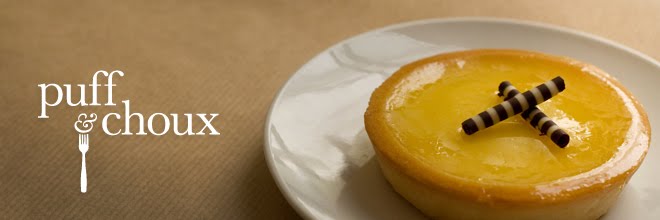
And then I saw it. On the last page of the seasonal gift online section, it beckoned to me as only the most delicious cake in the world can. It was a coconut cake with buttercream icing - just like Kamp's used to make! No more cheap mousse as a substitute for buttercream! No more fruit filling instead of icing in between layers! I had found it! I had found the Kamp's coconut cake reincarnated!

And to prove to you how awesome this cake was, I can honestly say that my family ate the entire cake in less than a day and a half. We aren't a family of fat asses, but we know a good cake when we taste it.

Be sure to enjoy today's Recipe of the Day - it took what felt like a lifetime to rediscover.

"Don't ever leave my side again" Coconut Buttercream Cake

Ingredients:
Cake
Cooking spray
1 tablespoon cake flour
2 1/2 cups cake flour (about 10 ounces)
2 teaspoons baking powder
1/2 teaspoon salt
2 cups sugar
6 tablespoons butter, softened
1/4 cup egg substitute
2 large eggs
3/4 cup light coconut milk
1/4 teaspoon coconut extract

Frosting
1 cup sugar
1/4 cup water
5 large egg whites
1/2 teaspoon cream of tartar
1/8 teaspoon salt
1/4 cup butter, softened
1/4 teaspoon coconut extract (optional)
3 tablespoons toasted flaked sweetened coconut

Equipment:
3 8-inch round cake pans
Wax paper
Measuring bowls
Measuring spoons
Measuring cups
Whisk
Electric mixer
Cooling rack
Saucepan
Wooden spoon
Spatula
Cake stand (to use while icing the cake)

Preheat oven to 350°.

To prepare cake, coat 3 (8-inch) round cake pans with cooking spray; line bottoms of pans with wax paper. Lightly coat wax paper with cooking spray; dust pans with 1 tablespoon flour.

Lightly spoon 2 1/2 cups flour into dry measuring cups, and level with a knife. Combine flour, baking powder, and salt, stirring with a whisk. Place 2 cups sugar and 6 tablespoons butter in a large bowl; beat with a mixer at medium speed for 2 minutes or until well blended. Add egg substitute and eggs to sugar mixture; beat well. Add flour mixture and coconut milk alternately to sugar mixture, beginning and ending with flour mixture. Stir in 1/4 teaspoon extract.

Spoon batter into prepared pans. Sharply tap the pans once on countertop to remove air bubbles. Bake at 350° for 25 minutes or until a wooden pick inserted in the center comes out clean. Cool in pans 10 minutes on wire racks; remove from pans. Remove wax paper; discard. Cool cakes on wire racks.

To prepare frosting, combine 1 cup sugar and 1/4 cup water in a saucepan; bring to a boil. Cook 3 minutes, without stirring, or until a candy thermometer registers 250°. Combine egg whites, cream of tartar, and 1/8 teaspoon salt in a large bowl; using clean, dry beaters, beat with a mixer at high speed until foamy. Pour hot sugar syrup in a thin stream over egg whites, beating at high speed until stiff peaks form, about 3 minutes. Reduce mixer speed to low; continue beating until egg white mixture cools (about 12 minutes).

Beat 1/4 cup butter until light and fluffy; stir in 1/4 teaspoon extract, if desired. Fold in 1 cup egg white mixture. Fold butter mixture into remaining egg white mixture, stirring until smooth.

Place 1 cake layer on a plate; spread with 1 cup frosting. Repeat twice with cake layers and 1 cup frosting, ending with cake layer; spread remaining frosting over top and sides of cake. Sprinkle with toasted coconut. Chill until set.

Baking a cake with olive oil? Once you stop rolling your eyes, read this article


Melissa Clark has an interesting article in the New York Times about baking with olive oil. Even better, her recipe doesn't involve using a food processor or electric mixer, so for those of you who are without such devices, I suggest you check out her article on quick cakes here.

Also, if you'd like to purchase the print version of the "Let Them Eat Cake" graphic at the top of this page, visit Blue Lima's Etsy shop - it only costs $12!

Whoopie for...well, whoopie cakes/pies/sandwiches/cookies!


The New York Times' food section features a terrific piece on the invasion of the whoopie, a strange combination of cake, cookie, sandwich and pie...and that really depends on how you look at it.

According to some food historians, the whoopie pie originated in Pennsylvania, where they were baked by Amish women and put in farmers’ lunchboxes. Tired from a morning’s work, the farmers purportedly would shout “Whoopie!” if they discovered one of the desserts in their lunch pails. As someone who has yelled out in delight from discovering a sweet treat, I can identify.

I had never heard of whoopie pies until I moved to the Northeast, so as the New York Times mentions, a lot of people haven't heard about this concoction. I suggest you educate yourself and read up on this class dessert/snack that defies all boundaries we set for it - you can't pigeon-hole this thing!

Vintage Blogging: Thank you Dunkin Donuts for making me look stupid.


Perhaps it's Puff and Choux's popularity, but my other blog, So I saw on the subway today..., is getting more and more traffic as well. Because of this, I was reading over some old posts and found another article I wrote that would be a good fit for this site.

The post deals with something I discovered a little over a year ago. I realized that I had been misspelling the word "doughnut" my entire life, and I place the blame squarely on Dunkin Donuts' shoulders. Below is the entire blog post. Enjoy!

Originally published November 17, 2008 on So I saw on the subway today...


I realized last night that for the majority of my adult life, I have misspelled the word "doughnuts." How could someone with a college degree in English misspell such a common word, you may ask. Well, here is a little secret: I only made it to the school spelling bee once in elementary school (5th grade), and I was kicked out in the first round. I don't even remember the word that got me disqualified, but I think that was the complete shock and mortification that sunk after realizing I hadn't even made it to Round #2: Verbs.

However, I now believe there is another culprit at large. When you break down in scientific terms exactly what constitutes a doughnut, you have some dough that is in the shape of a nut. Why not put the two together for fun?! But in 1950, William Rosenberg decided to unleash the ultimate mind fuck when he named his store Dunkin Donuts. Why he chose this spelling, I don't know. His first store's name was The Open Kettle, so I would assume if spelling wasn't his forte, he would have chosen Thee Opin Kettel. I can only guess that Rosenberg thought that Dunkin Donuts sounded catchy, and maybe he wanted to save on typewriter ink - donut is arguably shorter than doughnut. He obviously wanted to take the "ugh" out of ordering ink cartridges for his machine. Well, "ugh" is the noise I made when I realized how often I misspelled doughnut. Thanks Mr. Rosenberg. Your thriftiness has made me look like a dumb ass.

I can only guess that my early adoption of Dunkin Donuts' doughnut holes as a staple in my diet led to me believe that doughnuts was actually donut. Most people would believe that letting your six year old eat at least a dozen doughnut holes isn't a good idea, but it was the 1980s and EVERYBODY was eating doughnut holes. Ahhh...the Reagan years: A time where kids weren't fat, regardless of the fact that they ate McDonald's breakfast meals and Dunkin Donuts doughnut holes. Those were good times.

So Mr. Rosenberg, I'm telling you today that I might still have the inclination to leave out the "ugh", but I now know better. I'll be damned if your tasty donut holes trick me again. Dammit...

March 18, 2009

Recipe of the Day - Crème Brûlée (plus, Puff and Choux's 100th post and prize give-away!)


Several years ago, my best friend Emily and I thought about starting up a zine, which some might consider the predecessor to the blog. We knew it had to have a niche topic, so we decided on sushi and the people we hated in high school. Those were two specific subjects that we felt we could write endless articles about. A couple of cocktails later, the zine idea went out the window and as an alternative, we just sat around and bitched about bad sushi and high school.

Fast forward to a year or two after the zine fall out. Emily and I were sharing some crème brûlée at the end of a birthday dinner in Williamsburg. The subject of starting a blog came up, and we decided that crème brûlée would be a great topic. However, once again, a few cocktails interfered and that idea was ditched and instead we just vowed to always order crème brûlée whenever we saw it on a dessert menu moving forward. And we have done so for the past four years.

So in honor of that fallen blog that never was, today's Recipe of the Day is for the Queen of Desserts (at least in my mind) - Crème Brûlée.

Also, this is Puff and Choux's 100th post, so to the first reader to post a comment in the comment section of this blog that includes the name and contact info for a restaurant in your area that serves crème brûlée, I'll send you a dessert gift card from said restaurant so you too can enjoy this amazing treat. Everyone else - make it yourself using the recipe from Debbie Puente and her website - CrèmeBrûlée.com!

Be sure to leave your name and e-mail address with your comment so I know how to get in touch with you regarding the gift card!

"Crème Brûlée - Make my Day" Recipe

Equipment:
6 Ramekins
Large pan for water bath (for use in oven)
Hand-held torch
Mixing bowls
Whisk
Sieve
Measuring cups
Measuring spoons

Ingredients:
8 egg yolks
1/3 cup granulated white sugar
2 cups heavy cream
1 teaspoon pure vanilla extract
1/4 cup granulated white sugar (for the caramelized tops)

Preheat oven to 300ºF. In a large bowl, whisk together egg yolks and sugar until the sugar has dissolved and the mixture is thick and pale yellow. Add cream and vanilla, and continue to whisk until well blended. Strain into a large bowl, skimming off any foam or bubbles.

Divide mixture among 6 ramekins or custard cups. Place ramekins in a water bath (large pan filled with 1 or 2 inches of hot water) and bake until set around the edges, but still loose in the center, about 50 to 60 minutes. Remove from oven and leave in the water bath until cooled. Remove cups from water bath and chill for at least 2 hours, or up to 2 days. When ready to serve, sprinkle about 2 teaspoons of sugar over each custard. For best results, use a small, hand-held torch to melt sugar. If you don't have a torch, place under the broiler until sugar melts. Re-chill custards for a few minutes before serving.

Serves 6.

Favorite Dessert Quote of the Week


“The most dangerous food is wedding cake.” ~ James Thurber

(Courtesy of Foodimentary)

Need to know what produce is in season? Download Locavore on your iPhone and find out!


While going to buy raspberries for my recent raspberry custard pie recipe, I stopped myself while at the local grocer to ponder for a second: when are raspberries actually going to be in season? It's 30 degrees outside, so these are certainly not from around here..."

Ever find yourself at the grocery store wondering the same thing? Are you trying to be a champion of sustainable farming and helping the environment but aren't sure if that summer squash is actually growing outside at the moment?

To answer these types of questions, iPhone users can now download Locavore. This application collects data from multiple sources and presents the information on your phone.


Some of the features of Locavore include:
* Automatic detection of which state you're in (U.S. only for now)
* Alerts about what food is in season near you, as well as updates on what crops will be appearing in the produce section soon
* Locating farmers’ markets near you
* Browsing all 234 fruits and vegetables to see where they are currently growing
* Links to Wikipedia articles and Epicurious.com recipes from each food detail page
* Ability to browse all 50 states to see what’s in season in other parts of the US


Designed by the Natural Resources Defense Council, Local Harvest.org and Tattfoo, and built by and Matt Hickey, Locavore is available for purchase (cost: $2.99) in the iTunes App Store by visiting here.

Thanks to my roommate Peter, tech/gadget blogger extraordinaire, for the tip on Locavore!
Related Posts with Thumbnails